
Chocolate & Salted Caramel Cake
Updated: 3 hours ago


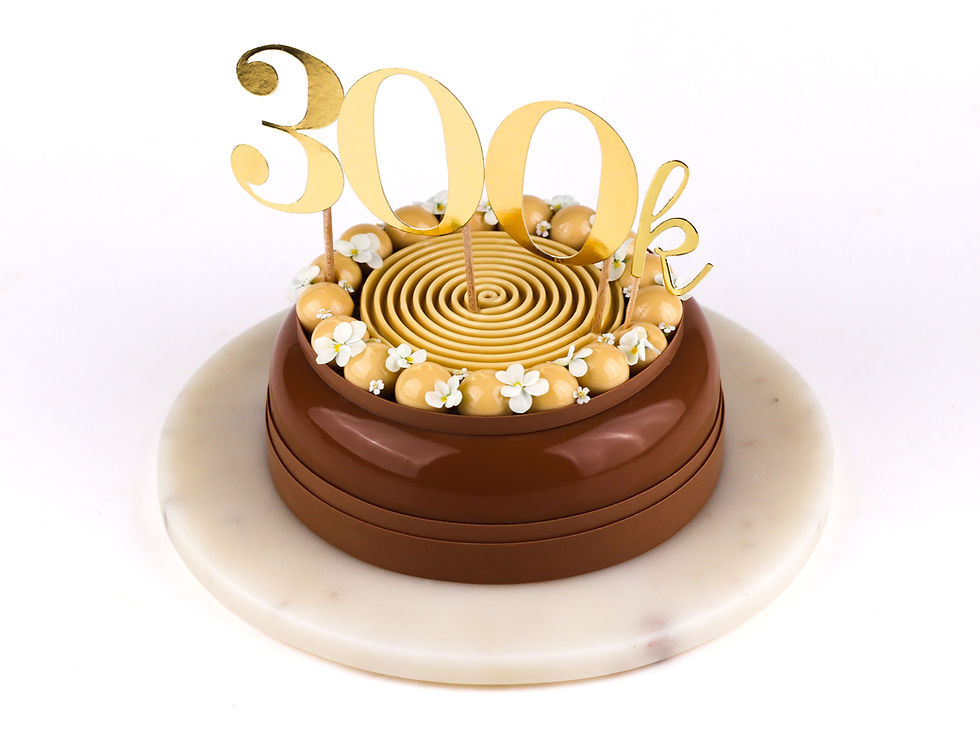
This cake is a very special one to me. I created it to celebrate reaching 300,000 followers on Instagram as my way of saying thank you for all the support you've shown me over the years. Every recipe you've baked, every comment you've left, every video you've watched, and every kind message you've sent has helped make this journey possible, and I'm so grateful to have such a wonderful baking community.
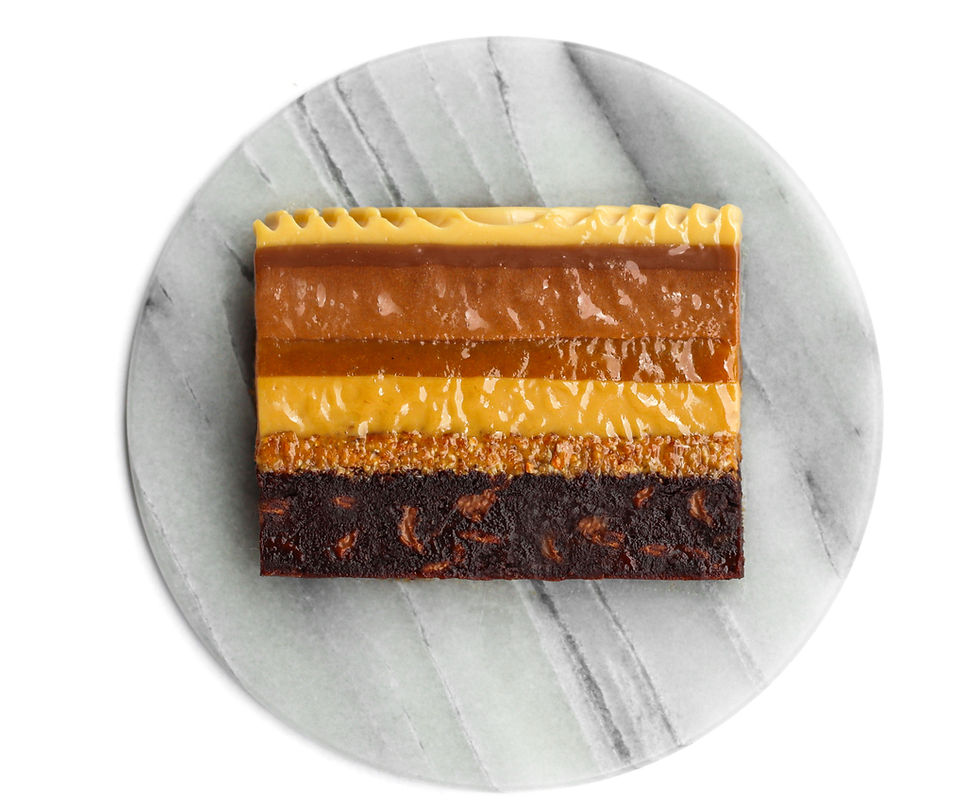
Since this recipe is a celebration, I wanted to create a cake that I knew almost everyone would love: a timeless combination of milk chocolate and salted caramel. Inside, you'll find fudgy brownie, crunchy hazelnut praliné, silky salted caramel, airy milk chocolate mousse, and a velvety salted caramel crémeux spiral.
This recipe also brings together many of my favourite cake elements and the essential entremet techniques I use throughout my recipes, making it the perfect introduction to my style of baking.
Happy baking <3




Amount: 10 people
This recipe contains affiliate links.
Cake Layer Overview:
Cake Base: Dark Chocolate Brownie
Crunch: Hazelnut Praliné & Feuilletine Crunch
Creamy Elements: Salted Caramel Ganache Salted Caramel
Mousse: Milk Chocolate Mousse Salted Caramel Mousse Balls
Decoration: Milk Chocolate Mirror Glaze
Caramel Chocolate Mirror Glaze Salted Caramel Crémeux Spiral Chocolate Decoration
NOTES:
When you start baking, begin by preparing the Crémeux spiral, as it should freeze for 24-48 hours before unmolding. Next, prepare the salted caramel, which needs time to set before it can be piped onto the cake. While they are setting, you can prepare the remaining layers to save time.
This recipe uses a bold 70% dark chocolate for a deeper, slightly bitter flavor that balances the caramel beautifully. If you prefer something less intense, you can also use 54% dark chocolate.
Essential Equipment:
Immersion hand blender (I recommend a Bamix)
Digital thermometer
Hand mixer
Pastry rings:
2 x 18 cm diameter
1 x 16 cm diameter
1 x 14 cm
1 x 11 cm
1 x 10 cm
Silicone mold 18 cm diameter - Silikomart Universo mold or similar
Silicone mold 5 ml, 2.2 cm diameter - Silikomart Truffles 5 or similar
Silicone spiral mold 14 cm diameter, 106 ml - Silikomart Tourbillon or similar
Alternative Decoration Options:
If you want to make a simpler cake design, I suggest the following options:
Skip the crémeux and mousse balls, and simply pipe the cremeux on top of the cake. Decorate with a chocolate ribbon around the piped cremèux.
Leave out caramel mousse balls and decorate the top with crémeux spiral, chocolate ribbon and flowers.
For extra support while baking, watch my step-by-step video tutorial showing you how to make the cake from start to finish:
Day 1
Salted Caramel Crémeux Spiral:
3/4 (0,75) gelatin sheet (1 sheet = 1,75 g, bloom value 240)
130 g caramel chocolate (I use Callebaut 30.4%)
32 g / 2 medium egg yolks
10 g caster sugar
160 ml heavy cream (min. 35%)
1/4 (0.25) tsp sea salt
NOTE: Make the crémeux first as it needs to set for at least 24 hours in the freezer, ideally up to 48 hours, as they need to be completely frozen to release cleanly from the mold without being too soft.
There will be leftover crémeux, as the recipe is kept at this portion size because blending a smaller quantity into an airy, bubble-free crémeux is challenging. Any remaining crémeux can be frozen for up to 3 months and used the next time you make a dessert.
Soak gelatin in cold water for 5-10 minutes
Carefully melt the chocolate (possibly in a bowl over a pan of simmering water / bain-marie) and put the chocolate aside in a bowl
Quickly whisk egg yolks and sugar lightly in another bowl
Heat heavy cream almost to a boil in a small saucepan and remove from heat. Pour the mixture over egg yolks/sugar and whip with a hand mixer
Return the mixture to the saucepan and stir over low heat while you carefully whisk until the cremeuex reaches 83°C. It is important to be precise with the temperature, as the tempering is crucial for enabling the crémeux to get out of the mold without breaking
Remove the saucepan from the heat, sift it and whisk in the gelatin
Pour the hot mixture over the melted chocolate while you stir in the middle with a rubber spatula. Hand blend the crémeux
Transfer the crémeux into a piping bag with a small hole in the bottom that fits the spiral
Place the spiral mold (I have used a Silikomart Tourbillon 100ML mold) on a chopping board and spread the crémeux in the spirals. Tab the spiral mold in the kitchen table several times to remove as many air bubbles as possible. Use a toothpick to run around the spiral to remove any remaining air bubbles
Put the spiral in the freezer for min. 24 hours, ideally 48 hours, to make sure that the spiral is completely frozen, as it otherwise cannot come out of the mold without breaking
Tips & Notes:
Heat the cream only until just before boiling as overheating can cause the egg yolks to overcook.
For a properly tempered crémeux with a silky texture that sets correctly and releases cleanly from the spiral mold without being too soft, the crémeux must be cooked to exactly 83°C / 181F°.
When blending the crémeux: Use an immersion hand blender to achieve a perfectly smooth texture.
To remove air bubbles: Use a toothpick to run around the spiral and tap the mold several times to remove air bubbles.
It is important to freeze the crémeux spirals for at least 24 hours, ideally 48 hours, to ensure it is completely frozen. Otherwise, it may break when unmolding.
Substitutions: Milk chocolate can be used instead of caramel chocolate.
Day 1
Salted Caramel:
50 g caster sugar
30 g glucose syrup
20 g whole milk
110 g heavy cream (min. 35% fat)
60 g glucose syrup
1/2 tsp sea salt
45 g butter, room temperature
NOTE: Prepare the salted caramel before the other cake layers, as it needs time to set before it can be piped onto the cake. While it is setting, you can prepare the remaining layers to save time.
Add the whole milk, heavy cream, 60 g glucose syrup and salt to a saucepan
Heat to a boil, then remove from the heat. Cover the saucepan with a clean tea towel to keep the mixture warm while you caramelize the sugar
In a separate saucepan, heat the caster sugar with 30 g glucose syrup to 180-185°C / 356-365°F, until it turns into a golden amber caramel
Gradually deglaze the caramel with the warm milk and cream mixture while whisking
Cook the caramel to 110°C / 230°F
Strain the caramel into a jug and let it cool to around 60°C / 140°F
When the caramel reaches around 60°C / 140°F, blend in the room-temperature butter with a hand blender
Pour the caramel into a container and cover it with cling film directly on the surface
Let the caramel cool to room temperature
Put the room temperature caramel in a piping bag
Tips & Notes:
The milk and cream mixture needs to be hot before adding it to the
caramel. If it is too cold, the caramel can seize, turn hard, or stick to the whisk.
Avoid stirring too much while the sugar is caramelizing. Gently swirl the pan instead if needed. Using a mix of sugar and glucose syrup helps keep the caramel smooth.
Add the hot cream mixture gradually, as the caramel will bubble up. Adding it slowly helps the caramel melt smoothly instead of forming hard lumps.
The final caramel texture depends on the final cooking temperature. If it is cooked too low, it will stay runny. If it is cooked too high, it can become too firm.
Blending in the butter at around 60°C / 140°F helps create a smooth, glossy caramel without the butter separating.
You can speed up the cooling and setting time by placing the caramel in the fridge. Before using it, remove it from the fridge and let it return to room temperature until it is soft enough to pipe.
Substitutions: I do not recommend substituting any ingredients.
Day 1
Dark Chocolate Brownie:
100 g dark chocolate (70%)
100 g butter
100 g caster sugar
125 g beaten eggs / 2 1/2 (2.5) eggs
1/2 (0.5) tbsp all-purpose flour
75 g roughly chopped milk chocolate (33%)
a pinch of salt
Preheat the oven to 180°C/356F° fan-assisted oven
Slowly melt butter in a small saucepan (the butter must not be too hot as this can seize the chocolate afterwards). Put the saucepan on low heat and add the dark chocolate. Stir until all the chocolate is melted
Remove the saucepan from the heat and pour the mixture in a bowl
Stir in sugar. Whip the eggs together with a fork in another bowl
Let the dough cool briefly and gradually add the eggs while whipping with a hand whisk
Finally add flour, salt and the roughly chopped milk chocolate
Pour the batter in a springform or pastry ring (16 cm diameter) lined with baking paper
Bake the brownie for approx. 24-27 min. at 180°C/356F° fan-assisted oven. The brownie is done when it has risen, the edges have developed cracks, there's no jiggle in the center, and a cake tester comes out without any fluid batter. It should still feel slightly underbaked, as it will continue to set while cooling
Let the brownie cool
Place it in a pastry ring (16 cm diameter) lined with acetate baking sheet at the sides and baking paper at the bottom. Level the surface of the brownie a little with a glass
Put the cake in the freezer while preparing the crunch layer
Tips & Notes:
Melt the butter at medium heat as too hot butter can seize the chocolate.
When mixing the batter, use a hand whisk, not an electric mixer as that will make the brownie less fudgy
Level the brownie batter evenly in the pastry rings using a spatula or palette knife. This helps the batter spread into the edges and corners, preventing air pockets and holes in the bottom of the baked brownie.
Be careful not to overbake the brownie. It's done when it has risen, the edges have developed cracks, the center no longer jiggles, and a cake tester comes out without any fluid batter. It should still feel slightly underbaked, as it will continue to set while cooling
Substitutions: You can use a dark chocolate with a lower cocoa percentage if you prefer a milder chocolate flavor. The chopped milk chocolate can also be replaced with any type of chocolate, such as dark or white chocolate.
Day 1
Hazelnut Praliné & Feuilletine Crunch:
105 g roasted hazelnuts
30 g caster sugar
2 1/4 (2.25) tsp sunflower / neutral oil
1/3 (0.33) tsp sea salt
40 g feuilletine
20 g white chocolate (28%)
20 g milk chocolate (33%)
Prepare praliné:
Carefully melt sugar to a golden caramel in a little saucepan
Immediately add the hazelnuts and stir until evenly coated with the caramelized sugar
Pour the caramelized nuts onto a piece of parchment paper and let them cool
Break the cooled caramelized hazelnuts into smaller pieces
Blend the caramelized hazelnuts, neutral oil and sea salt in a powerful food processor until smooth and fluid
Combine elements:
Carefully melt the white and milk chocolate together in a small saucepan. Put the saucepan aside
Stir in feuilletine and hazelnut praliné in the chocolate mixture
Spread approx. 145 g of crunch on top of the set brownie. Level the surface with a glass and a spoon
Put the cake in the freezer so the crunch layer can set. Once the crunch layer is set, the ganache can be added
Tips & Notes:
Melt the sugar to a light golden caramel - if it gets too dark, it will turn bitter
Blend the nuts until they reach a completely liquid consistency. This may take time and requires a strong food processor. Add more oil to achieve a thinner consistency
Substitutions: Hazelnut can be substituted for any kind of nuts. Feuilletine may be substituted with cornflakes; however, cornflakes absorb more liquid, so they will stay crunchy for a shorter time. Caramel chocolate (e.g. Callebaut Gold 30.4%) may be used instead of white and milk chocolate.
Day 1
Salted Caramel Ganache:
180 g caramel chocolate (I use Callebaut Gold 30.4%)
100 ml heavy cream (min. 35%)
1/2 (0.5) tsp sea salt
Carefully melt caramel chocolate and set the chocolate aside in a bowl
Heat heavy cream and salt in a small saucepan until just below the boiling point
Pour the hot mixture over the chocolate while stirring in the center with a spatula until the ganache becomes glossy
Transfer the ganache to a tall jug and blend with an immersion blender until smooth
Pour the ganache over the set crunch layer
Return the cake to the freezer where the ganache needs to set before the salted caramel can be added
Tips & Notes:
Only heat the cream almost to a boil, as a too hot cream will seize the chocolate mixture.
Season generously with sea salt for a stronger salted caramel flavor.
Substitutions: You can substitute caramel chocolate with milk chocolate; however, this will change the overall flavor profile and make the cake more chocolate-forward rather than balanced with caramel notes.
Day 1
Assembling, Part 1: Salted Caramel Insert
Pipe the room temperature salted caramel on top of the set salted caramel ganache. Level the layer with a palette knife and a spoon
Freeze the cake overnight
Day 2
Milk Chocolate Mousse:
2 gelatin sheets (1 sheet = 1.75 g, bloom 240)
200 g milk chocolate (33%)
300 ml heavy cream (min. 35%)
100 ml to be heated
200 ml to be whipped
Soak gelatin in cold water for 5-10 min
Melt the chocolate and put the chocolate aside in a bowl
Heat 100 ml heavy cream almost to a boil and remove it from the heat. Whisk the gelatin in the cream and let it cool slightly
Pour the hot cream (cooled to approx. 50°C / 122°F) over the chocolate while you stir in the middle of the bowl with a spatula. Let it cool to lukewarm
Whip 200 ml heavy cream to soft peaks and gently fold the cream into the lukewarm chocolate mixture (if it is too hot it can separate the cream)
Pour the mousse in a silicone mold at 18 cm diameter (I have used a Silikomart Universo mold) lined with a narrow acetate sheet (as the cake will be higher than the mold - see more details on how to do this here)
Take the frozen cake out of the freezer and gently put it down in the mousse with the salted caramel facing downwards. Smooth the bottom with a small palette knife
Freeze the cake fully overnight
Tips & Notes:
Only heat the cream almost to a boil before pouring it over the chocolate to avoid seizing the chocolate.
Whip the heavy cream to soft peaks, as overwhipped cream can result in a dense and grainy mousse.
The mousse might have liquid consistency, so it needs to set a bit before the frozen cake is added in, as it otherwise will sink to the bottom. Refrigerate briefly until slightly set - as a rule of thumb, it has set enough when you dip the end of a spoon in the mousse and it forms a soft peak when you remove the spoon from the surface.
When adding the frozen cake to the mousse, place the cake in the mousse first, then gently press it down. Hold the acetate sheet in place as you do this, so it doesn’t slide up.
Substitutions: Caramel chocolate may be used in place of milk chocolate, though the flavor will be noticeably different.
Day 2
Caramel Mousse Balls:
1 gelatin sheet (1 sheet = 1.75 g, bloom 240)
100 g caramel chocolate (I use Callebaut Gold 30.4 %)
150 ml heavy cream (min. 35%)
50 ml heated
100 ml whipped
a generous 1/4 (0.25) tsp sea salt
Soak gelatin in cold water for 5-10 min
Melt the chocolate and put the chocolate aside in a bowl
Heat 50 ml heavy cream and sea salt almost to a boil and remove it from the heat. Whisk the gelatin in the cream and let it cool slightly
Pour the hot cream (cooled to approx. 50°C / 122°F) over the chocolate while you stir in the middle of the bowl with a spatula. Let it cool to lukewarm
Whip 100 ml heavy cream to soft peaks and gently fold the cream into the lukewarm chocolate mixture (if it is too hot it can separate the cream)
Pour the mousse into a piping bag and fill at least 18 cavities of a 5 ml round silicone mold (I have used a Silikomart Truffles 5)
Freeze the mousse balls fully overnight
Tips & Notes:
Only heat the cream almost to a boil before pouring it over the chocolate to avoid seizing the chocolate.
Whip the heavy cream to soft peaks, as overwhipped cream can result in a dense and grainy mousse
Substitutions: Milk chocolate can be used instead of caramel chocolate, although it will result in a different flavor and a different appearance.
Day 3
Milk Chocolate Mirror Glaze - For The Cake:
6 gelatin sheets (1 sheet = 1.75 g, bloom value 240)
150 g milk chocolate (33%)
110 ml heavy cream (min. 35%)
50 g water
140 g caster sugar
150 g glucose syrup
White food coloring paste
Soak gelatin in cold water for 5-10 minutes
Chop chocolate finely and put it in a large plastic pitcher
Heat sugar, water, heavy cream and glucose syrup in a saucepan almost to a boil and remove from the heat. Whisk the gelatin into the mixture
Pour the cream over the chocolate in the pitcher and hand blend (place the hand blender at an angle when blending to avoid air bubbles). Add a bit of white food coloring paste to get a milk chocolate color
Cover the surface with cling film and cool the glaze down to 34°C-35°C / 93F°-95F°
Take the frozen cake out of the freezer just before you are ready to glaze. Place the cake on a baking cooling rack with baking paper underneath
Pour the glaze over the cake. Use two palette knives to run the bottom of the cake around on the rack to remove the glaze excess
Place the cake on a cake plate
Once the glaze has set slightly, use a 10 cm diameter pastry ring to make a light mark on top of the cake as a guide for placing the cremèx spiral
Tips & Notes:
Before mixing the hot syrup and the chocolate, let it set for 30 seconds so the chocolate can melt a bit.
Insert the blender in the jug at an angle to prevent creating air bubbles.
The cake needs to be completely frozen when the glaze is poured on. If the correct temperatures have been met, you’ll get a perfectly shiny mirror glaze encasing the cake.
Substitutions: White chocolate or caramel chocolate may be used in place of milk chocolate, though the flavor and color will be noticeably different.
Day 3
Assembling, Part 2: Trimming & Placing the Crémeux Spiral
Release the frozen crémeux spiral from the mold and place it on a piece of baking paper on a chopping board
Using an 11 cm pastry ring, cut out a circle from the spiral
Using a small palette knife and a meat needle, carefully transfer the spiral onto the center of the cake. It is best to work quickly, as the spiral defrosts and softens rapidly.
Place the cake in the fridge to thaw while you prepare the remaining decorations
Day 3
Caramel Mirror Glaze - For The Mousse Balls:
6 gelatin sheets (1 sheet = 1.75 g, bloom value 240)
150 g caramel chocolate (I use Callebaut Gold 30.4%)
110 g heavy cream (min. 35%)
50 g water
140 g caster sugar
150 g glucose syrup
White food coloring paste
NOTE: You can start preparing the glaze once the milk chocolate mirror glaze almost is ready.
Soak gelatin in cold water for 5-10 min
Chop chocolate finely and put it in a large plastic pitcher
Heat sugar, water, heavy cream and glucose syrup in a saucepan almost to a boil and remove from the heat. Whisk the gelatin into the mixture
Pour the cream over the chocolate in the pitcher and hand blend (place the hand blender at an angle when blending to avoid air bubbles). Add a bit of white food coloring paste to match the color of the crémeux spiral
Cover the surface with cling film and cool the glaze down to 34°C-35°C / 93F°-95F°
Take the frozen mousse balls out of the freezer just before you are ready to glaze. Place them on a baking cooling rack with baking paper underneath
Pour the glaze over the mousse balls. Use a small palette knife to run the bottom of the balls around on the rack to remove the glaze excess
Quickly, before the mousse balls begin to defrost, arrange them around the crémeux spiral. Use a small palette knife and a meat needle to release each mousse ball. Position any marked side facing outward, as it will later be covered by the chocolate ribbon.
Place the mousse balls as close to the spiral as possible, avoiding to letting them touch it, as the soft crémeux can easily lose its sharp, defined shape. You will need approximately 18 mousse balls
Continue until you have a full circle of mousse balls encasing the spiral
Tips & Notes:
Before mixing the hot syrup and the chocolate, let it set for 30 seconds so the chocolate can melt a bit.
Insert the blender in the jug at an angle to prevent creating air bubbles.
The mousse balls need to be completely frozen when the glaze is poured on. If the correct temperatures have been met, you’ll get a perfectly shiny mirror glaze.
Glaze more mousse balls than you actually need. This gives you extra pieces to choose from.
Work quickly when placing the mousse balls, as they soften rapidly at room temperature. Position them as close to the crémeux spiral as possible, avoid letting them touch it, otherwise the soft crémeux may lose its sharp, defined shape.
Substitutions: Milk chocolate or white chocolate may be used in place of caramel chocolate, though the flavor will be noticeably different.
Day 3
Chocolate Decoration & Decoration:
225 g milk chocolate (33%)
White chocolate coloring powder
Flowers
You can here see how you can learn to make chocolate ribbons.
Chocolate ribbon 1 (18 cm diameter): 2 cm x 60 cm
Chocolate ribbon 2 (18 cm diameter): 3 cm x 60 cm
Chocolate ribbon 3 (14 cm diameter): 1 cm x 47 cm
Place the widest chocolate ribbon around the cake
Place the second widest ribbon around the cake. Fasten the ends with a little melted chocolate
Place the smallest ribbon around the glazed mousse balls
Decorate with white flowers


Dobrý deň, v prvom rade, veľmi pekne ďakujem za recept ❤️
Otázka : akú značku používate bielu potravinársku pastu a práškovu bielu?? 🙏